
Frostpunk 2 Buildings Guide: Districts, Hubs and Upgrades
Our Frostpunk 2 buildings guide covers every district, key buildings, hubs and adjacency bonuses so you can heat, feed and supply your city efficiently.
Jump to

Every heat stamp and prefab you spend in New London either strengthens your economy or quietly drains it. That makes this Frostpunk 2 buildings guide less about what each structure does and more about where to put it and when. Districts, the buildings inside them, and the one-tile hubs between them all affect each other. A sloppy layout costs you heat, workforce and materials for the rest of the run.
How Districts, Buildings and Hubs Fit Together
Frostpunk 2 builds in three layers:
- Districts are the base of your economy. Housing, Food, Extraction, Industrial and Logistics districts each take a fixed number of tiles to start construction. Food, Extraction and Logistics districts must begin on a matching resource deposit.
- Buildings go into empty slots inside a district. They raise the district's base output or tackle problems such as squalor, crime or disease. You unlock them by researching ideas in the Idea Tree.
- Hubs are one-tile structures placed between districts. They buff every neighbor they touch.
Each district and building has requirements, demand and output. If a district's workforce or resource requirements aren't met, it shuts down. Unmet demand works differently: it feeds city problems like cold or squalor, but the district keeps producing as long as its requirements are covered. You can also scale a district's employment with the percentage slider. Lowering it cuts workforce and resource requirements in exchange for less output.
Demolishing a district or building refunds the prefabs used to build it. Keep that in mind when a deposit runs dry.
District Basics and Expansion
Most districts can be expanded once, going from six tiles to nine. Housing Districts can be expanded twice, and they change shape as they grow, from regular to dense to high-rise. Expansion doesn't raise a district's workforce or heat demand, and it adds building slots. That makes it almost always better value than placing a new district.
 Image: Steam / 11 bit studios
| District | Base requirements | Base output | Notes |
|---|---|---|---|
| Housing | 200 workforce, 40 heat | 20 shelter | +5 shelter per expansion (30 max); no building slot until expanded |
| Food | 600 workforce, 40 heat, 25 materials | 50 food | 60 food when expanded; starts with one slot |
| Extraction (Frozen Forest) | 600 workforce, 20 heat, 50 materials | 150 materials | 190 when expanded |
| Extraction (shallow iron vein) | 600 workforce, 20 heat, 50 materials | 200 materials | 300 when expanded |
| Industrial | 600 workforce, 20 heat, 50 materials | 25 goods (or prefabs) | 30 goods when expanded; can be built anywhere |
Two quirks to watch:
- A Housing District has no building slots when first built. Expand it at least once before you can place a Research Institute or anything else inside.
- An Industrial District toggles between prefabs and goods. Older versions reset that toggle when you expanded the district. Patch 1.5.4 fixed this, but check the setting after expanding anyway.
Placement: Area Effects and Adjacency
An area effect applies once at least three of a district's tiles sit inside it. The construction tooltip shows one dot per tile under the effect, and the bonus activates when all dots are filled.
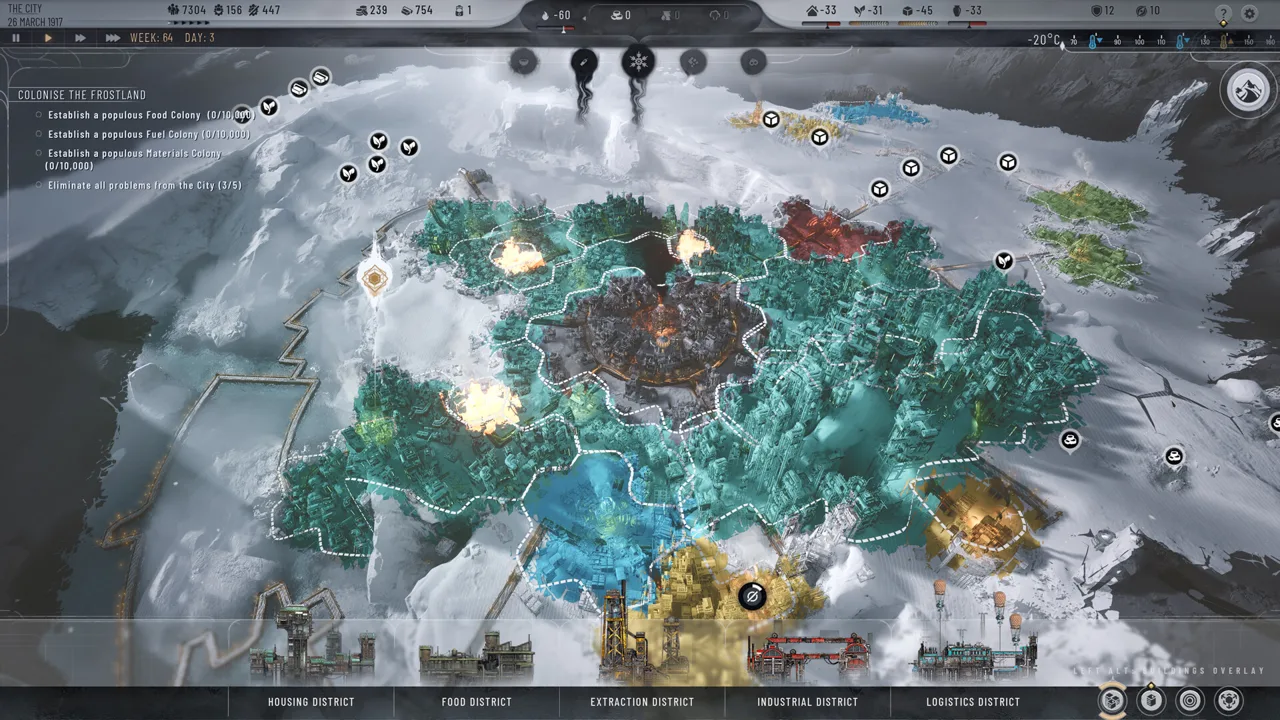 Image: Steam / 11 bit studios
The placement rules worth memorizing:
- Canyons next to the generator shelter Housing Districts from the wind, cutting their heat demand. A housing district with at least three tiles in a canyon gets the bonus.
- Housing next to housing, and housing next to food, both lower heat demand. Stack the canyon bonus with adjacency, and the starting canyons can hold a cluster of housing districts with a double heating discount.
- Extraction next to industry saves heat, and Industrial Districts bordering Extraction consume fewer materials.
- Industry or extraction next to housing adds squalor. Industrial Districts bordering housing do get a lower workforce requirement, so weigh that against the squalor before you place them together.
- Never put Food Districts next to Industrial or Extraction Districts. Toxic air raises disease.
A clean template: housing on one side of your food districts, industry and extraction on the other. Roads generate randomly, so build toward the next district you plan to connect. That steers road placement more reliably than leaving open ground.
Cover as many deposit tiles as possible with a single district.
Housing District Buildings
Shelter shortages cause the cold problem, and cold kills. These buildings stretch each Housing District further.
 Image: Steam / 11 bit studios
| Building | Where | Workforce / heat | Shelter | Trade-off |
|---|---|---|---|---|
| Housing Block | Housing | 50 / 20 | 10 | None |
| Dense Housing Block (Merit) | Housing | 50 / 20 | 25 | More disease |
| Subsidized Housing Block (Equality) | Housing | 50 / 20 | 20 | Costs heat stamps |
| Workers' Village (Equality) | Food, Extraction, Industrial | 100 / 10 | 20 | ~15% production efficiency, costs heat stamps |
| Workers' Dormitory (Merit) | Food, Extraction, Industrial | 100 / 10 | 15 | ~30% production efficiency, more disease |
The efficiency bonus from the worker housing buildings scales with the whole district's base output, including other buildings in it. That makes them strong in an already-upgraded production district.
Two laws work with these. Mandatory Crowding raises housing district shelter by about 20% at the cost of tension. Merit-based Housing gives about half that shelter bonus plus a heat stamp boost. A fully expanded Housing District with two Dense Housing Blocks under Mandatory Crowding reaches 96 shelter.
Housing Districts also hold your service buildings:
- Research Institute, available from the start, unlocks the Idea Tree. Build it in your first expanded Housing District.
- Watchtowers reduce crime and add guard squads. The patrol version uses 200 workforce for 16 squads. The Surveillance Watchtower uses 100 fewer workers for four fewer squads. Pick it when you have many housing slots but little spare workforce.
- Filtration towers go in Housing Districts and tackle squalor.
Food, Material and Goods Buildings
Going tall beats going wide. A building in an existing district usually adds as much as a new district for a fraction of the upkeep. For example, a Dust Coal Mine can nearly double an extraction district's coal for 20 more materials.
Hothouses (Food Districts)
| Hothouse | Workforce | Heat | Food | Advanced version food |
|---|---|---|---|---|
| Drum Hothouse (basic) | 400 | 40 | 60 | 120 |
| Chemical Hothouse (Progress) | 300 | 40 | 50 | 80 |
| Biowaste Hothouse (Adaptation) | 400 | 20 | 70 | 100 |
Advanced hothouses need steam cores but cost the same workforce and heat. Every hothouse unlocks Excessive Fertilization, a district ability that boosts food output by roughly 50% while raising disease. Late game, the Panaceum Factory, a radical Reason building, goes in Industrial Districts. It uses 200 workforce and 20 heat, produces 50 food and lowers disease.
Material Buildings (Extraction Districts)
Sawmills go on Frozen Forest districts, Foundries on iron veins:
- Sawmill – basic: 400 workforce, 60 heat, 150 materials. Progress: 300 workforce, 200 materials, more squalor. Adaptation: 400 workforce, 20 heat, 170 materials, more disease.
- Foundry – basic: 400 workforce, 60 heat, 200 materials. Blast Foundry: 300 workforce, 250 materials, more squalor. Silica Foundry: 400 workforce, 20 heat, 200 materials, more disease.
- Advanced Foundry – 600 workforce, 60 heat, 400 materials. The advanced blast version needs only 400 workforce and gives 450.
- Composite Factories turn 80–100 oil into 300 materials in Industrial Districts. They're a strong late-game option once oil is flowing.
Goods and Prefab Buildings (Industrial Districts)
- Mechanical Factory (Progress): 300 workforce, 40 heat, 60 materials, 40 goods, more squalor.
- Salvaging Factory (Adaptation): 400 workforce, 20 heat, 40 materials, 40 goods, more disease.
- Goods Factory: 400 workforce, 20 heat, turns 70 materials into 60 goods.
- Refurbished Goods Factory: 400 workforce, 10 heat, turns 30 materials into 60 goods. It needs a core and adds disease.
- Labor Camp (radical Merit): 100 workforce, 80 materials, 100 goods. It raises tension, and its Hard Labor ability can kill workers.
Research a basic factory early. Unlike a bare Industrial District, it produces prefabs and goods at the same time, roughly 10 prefabs a week alongside goods. Prefab deposits on abandoned ruins hold only a few hundred prefabs each and drain fast, so once a factory is running, skip the Extraction Districts there and keep those 600 workers for other jobs.
Fuel Buildings
Coal mines come in two main flavors. The Dust Coal Mine needs more workers but only 20 materials. The Blasting Coal Mine mines faster, but faster mining doesn't add coal to the deposit, so blasting mines empty your fields sooner. Pump jacks and geothermal plants fill the same role for oil and steam, and each has an advanced version.
If you chose to defeat the frost, the Deep Melting Drill in an Extraction District unlocks deep deposits. It costs a core, and those deposits are effectively infinite. On the adaptation path, settlement heating turns frostland outposts into permanent settlements instead.
Hubs: Leave Room Between Districts
Hubs are why experienced players leave single empty tiles in the middle of district clusters. A hub affects a district once three of that district's tiles fall within its area. A two-tile gap between three districts lets both tiles reach all three, so plan those gaps before you place your districts.
- Stockpile hubs (food, fuel, materials) raise storage caps and cut workforce in matching neighbors. In the prologue, a food stockpile next to a food district cut its workforce requirement by 15%. Build your first fuel stockpile between two coal districts.
- Heating Hub cuts the heat demand of every district it touches. In a housing cluster that worked out to +40 heat per district. Leave it switched off until temperatures drop.
- Air Transport Hub reduces workforce requirements in neighboring districts. It costs only 50 workforce and 20 materials to run. Since patch 1.5.4 it also affects the buildings inside those districts.
- Maintenance Hub uses 100 workforce and 20 heat to cut neighbors' material demand by 40.
- Communications, surveillance, emergency medical and fighting hubs handle trust, crime, disease and tension.
Pair two heating hubs and a maintenance hub around a line of Industrial Districts, and the districts themselves need no heat or materials. Put two Panaceum Factories, composite factories or Labor Camps in each, and that block becomes a dedicated food, materials or goods engine.
Before the first Whiteout, plan storage carefully. A mid-sized city needs at least 150,000 food stored. That means two food storage hubs on top of the 50,000 your central district holds, and 200,000 is the safer target.
Research Institutes and Build Order
Your opening sequence:
- Frostbreak to the nearest coal and build an Extraction District there.
- Place housing in the generator-adjacent canyons.
- Build the Council Hall in the central district to unlock laws.
- Expand a Housing District and build a Research Institute.
- Frostbreak to the Old Waystation for a Logistics District, then expand it to reach 20 Frostland Teams.
- Research coal mines, then Sawmills, hothouses and a factory.
Extra Research Institutes speed up research with diminishing returns. About four institutes roughly halves research time, and stacking beyond that barely helps. Since the Breach of Trust update, the first two institutes give a smaller speed boost than before. The Rush Researchers district action now lasts 20 weeks instead of 30, with a smaller bonus, and it still costs trust.
Building Changes From Recent Updates
| Update | What changed for buildings and hubs |
|---|---|
| Fractured Utopias | 8 faction hubs and 8 faction-specific Housing District variants in Utopia Builder |
| Patch 1.5.4 | Air Transport Hub now affects buildings inside districts; production districts no longer reset output mode on expansion |
| Breach of Trust | Free Fishing Hub on the Aurora map; Research Institute and Rush Researchers bonuses reduced |
| Hotfix 1.6.1 | Stabilizer Hubs now refund properly when demolished |
The Surge, the third expansion, launches December 14, 2026 on PC and consoles. It adds storm-driven technology that harvests Whiteouts as a resource. You can grab the base game and expansions on the Frostpunk 2 Steam page.
FAQ
Why can't I build a Research Institute?
It goes into a Housing District building slot, and new Housing Districts have none. Expand one Housing District once, and the slot opens up.
Should I build Extraction Districts on prefab ruins?
Usually not. The deposits are small and run out fast. A basic factory in an Industrial District gives you a steady trickle of prefabs plus goods, and the City Development Effort law adds passive prefabs too.
How many Research Institutes are worth building?
Around four. Each extra institute speeds research less than the one before, and the first two give a smaller boost since the Breach of Trust update.
Continue with
 Frostpunk 2 Food Guide: Districts, Hothouses & StockpilesFrostpunk 2 food guide: build Food Districts, pick the right Hothouse, pass food laws, and stockpile enough to keep your city fed through the Whiteout.
Continue exploring
Frostpunk 2 The Surge: Release Date, Features & Prep Tips
Frostpunk 2 The Surge launches December 14 on PC, PS5 and Xbox. Discover the Tesla-inspired resource, storm tech, the US valley setting and how to prepare.

Frostpunk 2 Factions Guide: All 12 Factions and Abilities
Learn how Frostpunk 2 factions form, what each one believes, and which abilities they unlock in Story Mode and Utopia Builder. Then win over the Council.
Join the community
Official channels for news, updates and player help: